Pythonに標準でついているGUIで、 Tcl/TkをPythonに移植したものがTkinterです。
これらは、Pythonとは別にインストール必要です。
ウインドウ上に配置する部品のことを、ウィジェットと言います。
ウィジェットは、以下の形式でインスタンスを作成します。
変数 = ウィジェット名(親ウインドウまたは親ウィジェット, [オプション])
Frame
Label
Message
Button
Radiobutton
Checkbutton
Listbox
Scrollbar
Scale
Entry
Menu
Menubutton
Bitmap
Canvas
Text
LabelFrame
Spinbox
PanedWindow
foreground(fg)
background(bg)
text
textvariable
image
bitmap
borderwidth(bd)
relief
height
width
anchor
Tkinterで、色を指定するには以下の形式を使用します。
各R,G,Bの記号は4bitの16進数を表します。
例えば、#ffff00は赤255、緑255、青0で黄色になります。
ウィジェットをウインドウ上に配置するには、以下のメソッドを使用します。
place()
pack()
grid()
このうち、pack()とgrid()は、ウィジェットの数・大きさによってウィンドウの大きさが変わります。
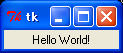
ラベルのついたウインドウを作成します。
#!/usr/bin/env python
import Tkinter

label = Tkinter.Label(None, text='Hello World!')
label.pack()
label.mainloop()
#!/usr/bin/env python
import Tkinter
label = Tkinter.Label(None, text='Hello World!')
label.pack()
label.mainloop()
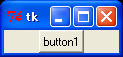
ボタンを表示するだけのウインドウを作成します。
#!/usr/bin/env python
import Tkinter

root = Tkinter.Tk()
button = Tkinter.Button(root, text='button1')
button.pack()
root.mainloop()
root = Tkinter.Tk()
button = Tkinter.Button(root, text='button1')
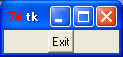
押すとウインドウを閉じるボタンを作成します。
#!/usr/bin/env python
import sys
import Tkinter

root = Tkinter.Tk()
button = Tkinter.Button(root, text='Exit', command=sys.exit)
button.pack()
root.mainloop()
button = Tkinter.Button(root, text='Exit', command=sys.exit)
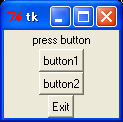
任意の関数を実行するボタンを作成します。
#!/usr/bin/env python
import sys
import Tkinter

def func1():
	label.configure(text='button1 pressed')

def func2():
	label.configure(text='button2 pressed')

root = Tkinter.Tk()
label = Tkinter.Label(root, text='press button')
label.pack()
button1 = Tkinter.Button(root, text='button1', command=func1)
button1.pack()
button2 = Tkinter.Button(root, text='button2', command=func2)
button2.pack()
button3 = Tkinter.Button(root, text='Exit', command=sys.exit)
button3.pack()
root.mainloop()
label.configure(text='button1 pressed')
button1 = Tkinter.Button(root, text='button1', command=func1)
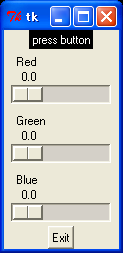
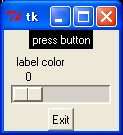
スライダによって、ラベルの色が変化するウインドウを作成します。
スライダは、0から255の間で1づつ変化します。
#!/usr/bin/env python
import sys
import Tkinter

def color_red(n):
	label.configure(bg='#%02x0000' % scale1.get())

root = Tkinter.Tk()
label = Tkinter.Label(root, text='press button', fg='#ffffff')
label.pack()
scale1 = Tkinter.Scale(root, label='label color', orient='h', from_=0, to=255, command=color_red)
scale1.pack()
button1 = Tkinter.Button(root, text='Exit', command=sys.exit)
button1.pack()
root.mainloop()
label.configure(bg='#%02x0000' % scale1.get())
label = Tkinter.Label(root, text='press button', fg='#ffffff')
scale1 = Tkinter.Scale(root, label='label color', orient='h', from_=0, to=255, command=color_red)
orient='h'
from_=0
to=255
command=color_red
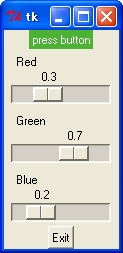
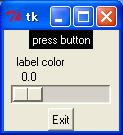
同様にスライダによって、ラベルの色が変化するウインドウを作成します。
スライダは、0.0から1.0の間で0.1づつ変化します。
#!/usr/bin/env python
import sys
import Tkinter

def color_red(n):
	label.configure(bg='#%02x0000' % (int)(scale1.get()*255))

root = Tkinter.Tk()
label = Tkinter.Label(root, text='press button', fg='#ffffff')
label.pack()
scale1 = Tkinter.Scale(root, label='label color', orient='h', from_=0.0, to=1.0, resolution=0.1, command=color_red)
scale1.pack()
button1 = Tkinter.Button(root, text='Exit', command=sys.exit)
button1.pack()
root.mainloop()
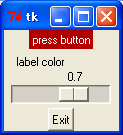
scale1 = Tkinter.Scale(root, label='label color', orient='h', from_=0.0, to=1.0, resolution=0.1, command=color_red)
from_=0.0
to=1.0
resolution=0.1