レイアウト2 (FormLayout と tabLayout)
FormLayout と tabLayout
ここでは FormLayout と、
tabLayout の使用方法を練習してみましょう。
formLayout はレイアウトの中で最も自由がきくもので、
ウインドウの上下左右からの絶対位置や、
他の部品からの相対位置によって部品を配置することができます。
tabLayout はタブを作成することができます。
このコマンドを実行すると、
それ以降の部品・レイアウトはタブグループになり、 1 つのタブになってゆきます。
FormLayout と tabLayout の使用例
まず、FormLayout によってタブの部分と Close ボタンを配置し、tabLayout によって A・B ボタンのあるタブと C・D ボタンのあるタブを切替えることができるようにしてみましょう。
- 以下の MEL スクリプトを layout5.mel という名前で作ります。
string $windowName = `window -title "layout5"`;
string $form = `formLayout`;
string $closeButton = `button -label "Close" -command ("deleteUI " + $windowName)`;
formLayout -edit
	-attachForm $closeButton "top"    130
	-attachForm $closeButton "left"   0
	-attachForm $closeButton "bottom" 0
	-attachForm $closeButton "right"  0
	$form;
string $tabs = `tabLayout -innerMarginWidth 10 -innerMarginHeight 10`;
formLayout -edit
	-attachForm $tabs "top"    0
	-attachForm $tabs "left"   0
	-attachControl $tabs "bottom" 10 $closeButton
	-attachForm $tabs "right"  0
	$form;
string $tab1 = `columnLayout`;
	button -label "A";
	button -label "B";
setParent ..;
string $tab2 = `columnLayout`;
	button -label "C";
	button -label "D";
setParent ..;
tabLayout -edit -tabLabel $tab1 "Tab1" -tabLabel $tab2 "Tab2" $tabs;
showWindow;
- この MEL スクリプトを読み込んで実行すると、以下のウインドウが表示されます。
各ボタンにはコマンドを割り当てていないので押しても何も実行されません。
![[layout5.melの実行結果]](../mel-ad02/layout5-1.jpg)
![[layout5.melの実行結果]](../mel-ad02/layout5-2.jpg)
スクリプトの解説
string $windowName = `window -title "layout5"`;
- ウインドウを layout5 というタイトルで作ります。
string $form = `formLayout`;
- formLayout を作ります。
string $closeButton = `button -label "Close" -command ("deleteUI " + $windowName)`;
- ウインドウをクローズするためのボタンを作ります。
tabLayout の後で作るとタブグループの 1 部になってしまうのでここで作っておきます。
formLayout -edit
- formLayout($form)をエディットモードによって編集します。
-edit フラグによってあらかじめ作っておいた formLayout のパラメータを変更することができます。
この -edit フラグは他の多くの MEL コマンドでも使用できます。
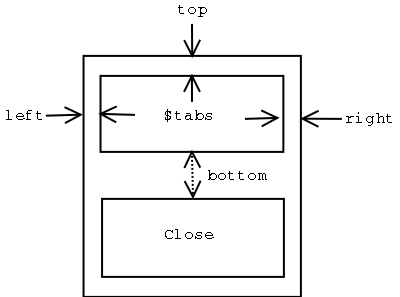
-attachForm $closeButton "top" 130
- ボタン($closeButton)の上辺はウインドウ上辺から130ピクセルの位置にします。
-attachForm $closeButton "left" 0
- ボタン($closeButton)の左辺はウインドウ左辺から0ピクセルの位置にします。
-attachForm $closeButton "bottom" 0
- ボタン($closeButton)の下辺はウインドウ下辺から0ピクセルの位置にします。
-attachForm $closeButton "right" 0
- ボタン($closeButton)の右辺はウインドウ右辺から0ピクセルの位置にします。
$form;
- formLayout の名前の入った変数です。
formLayout -edit コマンドはここで終りになります。

string $tabs = `tabLayout -innerMarginWidth 10 -innerMarginHeight 10`;
- tabLayout を作ります。
作られた tabLayout の名前は後で formLayout コマンドや tabLayout コマンドで使用するので変数 $tabs に代入しておきます。
- -innerMarginWidth 10
- タブの内部に配置される部品の左右に置かれるマージンを 10 ピクセルにする。
- -innerMarginHeight 10
- タブの内部に配置される部品の上下に置かれるマージン 10 ピクセルにする。
formLayout -edit
- formLayout($form)をエディットモードによって編集します。
-attachForm $tabs "top" 0
- タブ($tabs)の上辺はウインドウ上辺から 0 ピクセルの位置にします。
-attachForm $tabs "left" 0
- タブ($tabs)の左辺はウインドウ左辺から 0 ピクセルの位置にします。
-attachControl $tabs "bottom" 10 $closeButton
- タブ($tabs)の下辺はボタン($closeButton)の上辺から 10 ピクセルの位置にします。
-attachForm $tabs "right" 0
- タブ($tabs)の右辺はウインドウ右辺から 0 ピクセルの位置にします。
$form;
- formLayout -edit コマンドはここで終りです。
string $tab1 = `columnLayout`;
- columnLayoutを作ります。
ここから setParent .. までが 1 つ目のタブグループになります。
button -label "A";
- A ボタンを作ります。
button -label "B";
- B ボタンを作ります。
setParent ..;
- ここまでが 1 つ目の columnLayout の範囲です。
string $tab2 = `columnLayout`;
- columnLayout を作ります。
ここから setParent .. までが 2 つ目のタブグループになります。
button -label "C";
- C ボタンを作ります。
button -label "D";
- D ボタンを作ります。
setParent ..;
- ここまでが 2 つ目の columnLayout の範囲です。
tabLayout -edit -tabLabel $tab1 "Tab1" -tabLabel $tab2 "Tab2" $tabs;
- tabLayout を編集モードにして 1 つ目のタブ($tab1)にTab1というラベルを、
2 つ目のタブ($tab2)に Tab2 というラベルをつけます。
-
showWindow;
- ウインドウを表示します。


練習
- 上の layout5.mel を参考にして layout6.mel を作り、
tabLayout の中で以下のようにボタンが横に並ぶようなレイアウトの MEL スクリプトを作ってください。
![[layout6.melの実行結果]](../mel-ad02/layout6-1.jpg)
![[layout6.melの実行結果]](../mel-ad02/layout6-2.jpg)
- layout6.mel を参考にして layout7.mel を作り、ボタンを押すと各プリミティブが作られるようにしてください。
Torus は torus コマンドによって作ります。
![[layout7.melの実行結果]](layout7-1.png)
![[layout7.melの実行結果]](layout7-2.png)
まとめ
- 部品を自由な位置(絶対位置、相対位置)に配置するには formLayout を使用します。
- tabLayout によってコマンドをタブごとにまとめることができます。
練習課題
参考
Prev | Next
Home | Contents
Mail